- Blindly aiming for high coverage can degrade test quality as developers may prioritize increasing coverage metrics over writing meaningful, effective tests.
- What’s more important than the coverage number is how you use code coverage itself.
- Code coverage can be effectively used to identify weaknesses in your test design, highlighting areas that need better testing approaches.
In this post, we will discuss code coverage, exploring both its potential for misusage and proper usage.
Code Coverage Basics
Code coverage is a metric used to measure the percentage of your code that is executed when running your tests. It helps you understand how much of your codebase is covered by tests and can identify untested parts of your application. To achieve this, we typically use code coverage tools.
For example, consider the following code and test in Python:
# app.py
def add(a, b):
    return a + b

def subtract(a, b):
    return a - b
# test_app.py
from app import add


def test_add():
    assert add(2, 3) == 5
In this example, the test covers the add() function but doesn’t cover the subtract() function.
To visualize this, let’s look at how a code coverage tool like Coverage.py might report the coverage for the above code:
| Name | Stmts | Miss | Cover |
|---|---|---|---|
| app.py | 4 | 1 | 75% |
| test_app.py | 3 | 0 | 100% |
| TOTAL | 7 | 1 | 86% |
In this case, the app.py file has 75% coverage, as 3 out of 4 statements are covered.
This is due to how Python measures code coverage—the def and class lines in any Python file are executed upon import, even if the functions themselves are not called.
Consequently, any potential bugs in the subtract() function would go unnoticed.
To increase coverage, you would write an additional test, such as:
# test_app.py
from app import add, subtract


def test_add():
    assert add(2, 3) == 5

def test_subtract():
    assert subtract(5, 3) == 2
By adding the test_subtract() function, you increase the code coverage, ensuring that both the add() and subtract() functions are tested.
Running the code coverage tool again would likely show 100% coverage, as all functions and code paths are now tested:
| Name | Stmts | Miss | Cover |
|---|---|---|---|
| app.py | 4 | 0 | 100% |
| test_app.py | 5 | 0 | 100% |
| TOTAL | 9 | 0 | 100% |
Types of Code Coverage
There are several types of code coverage, each providing a different perspective on how thoroughly your code is tested. The coverage percentage can vary depending on the type of coverage being measured.
Some of the most common types of code coverage include:
- Function coverage
- Statement coverage
- Branch coverage
- Condition coverage
To explain how these types of coverage work, let’s consider the following code:
# app.py
def is_eligible_for_discount(age: int, is_student: bool) -> bool:
    """
    Determines if a person qualifies for a discount based on their age and student status.
    """
    if is_student:
        return True
    if age < 18 or 65 <= age:
        return True
    return False
# test_app.py
from app import is_eligible_for_discount


def test():
    assert is_eligible_for_discount(17, True) is True
    assert is_eligible_for_discount(18, False) is False
In this test, we are checking two scenarios: a 17-year-old student and an 18-year-old non-student. While this test might pass, it doesn’t necessarily mean we’ve achieved high code coverage. Different types of code coverage will reveal different aspects of how thoroughly this function is tested.
Function Coverage
Function coverage measures whether each function in the code has been executed at least once. It answers the question, “Have all the functions in the code been called?”
If you measure the test above, function coverage would be 100% as both is_eligible_for_discount and test functions are called during the test execution.
Statement Coverage
Statement coverage measures whether each line (or statement) in the code has been executed. It answers the question, “Have all the lines in the code been executed?”
If you measure the test above, statement coverage for app.py would be about 83% (5 out of 6 statements) as the return statement within the second if block (if age < 18 or 65 <= age) is executed, but the last return statement return False is never executed in the test case.
This is the most commonly used type of code coverage because it strikes a good balance between simplicity and practicality. Its straightforward approach makes it accessible even for teams with limited resources or time. This allows them to quickly gain insights into their code’s reliability without the complexity of more advanced coverage types.
Branch Coverage
Branch coverage measures whether each possible branch (or path) in control structures (like if statements) has been executed.
It answers the question, “Have all the paths in the code been executed?”
If you measure the test above, branch coverage for app.py would be about 80% as the if is_student: branch and the if age < 18 or 65 <= age: branch are both covered, but the path where is_student is False and age does not meet the condition (18 <= age < 65) is not covered.
Condition Coverage
Condition coverage, also known as predicate coverage, measures whether each boolean sub-expression (condition) in the code has been tested for both true and false outcomes. It answers the question, “Have all the individual conditions been tested for both true and false?”
If you measure the test above, condition coverage for app.py would be only about 50%.
This is because, while the condition is_student is tested for both true and false, the condition within the if age < 18 or 65 <= age: statement is only partially tested.
Specifically, only the age < 18 part of the condition is tested, while the 65 <= age condition is not evaluated in the current test cases.
Although the actual coverage percentage might differ slightly depending on the tools and metrics used, this example illustrates how condition coverage can identify untested logical paths in your code, encouraging more comprehensive testing.
Code Coverage vs Test Coverage
While the terms “code coverage” and “test coverage” are often used interchangeably, they refer to different aspects of software testing.
Code coverage specifically measures the percentage of a program’s source code that is executed during testing. It focuses on the technical details of code execution to ensure that all lines, branches, and paths are exercised by the test cases.
On the other hand, test coverage takes a broader perspective. It assesses whether all required features and functionalities of the software are tested according to the defined requirements. Test coverage ensures that the software meets its intended purpose and behaves as expected from a user’s perspective, so to speak.
Target Coverage Values?
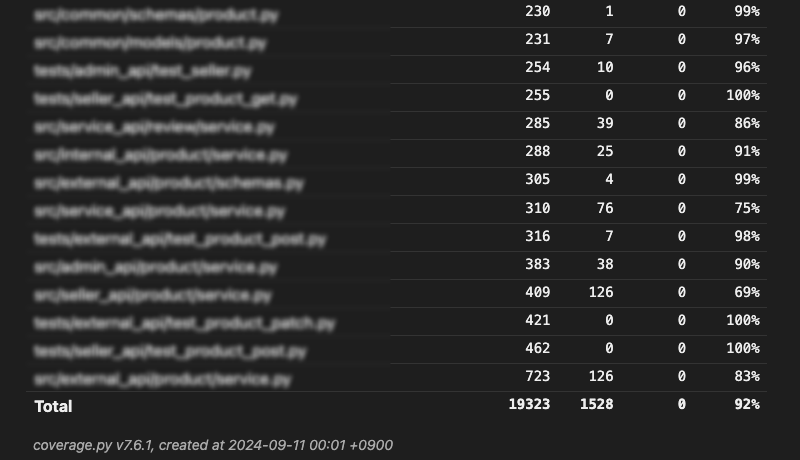
(A snippet of a code coverage report from one of the projects I maintain. I usually expect a similar coverage for other projects as well.)
It seems that the most common code coverage targets used in many companies typically fall between 80% and 90%.
Some safety-critical applications require 100% coverage for certain types of tests. For example, in the aerospace industry, software used in flight control systems often mandates 100% branch coverage to ensure that every possible execution path is thoroughly tested.
Benefits
I think having a target coverage value does have its benefits. Based on my experience, developers generally fall into two categories when it comes to testing:
- Developers who write tests because they understand and appreciate the value of testing.
- Developers who write tests only when required, either by team policy or other mandates.
For the first type, coverage percentage is not really a concern or hassle. I believe measuring their test suite at any point would easily beat 90% coverage. They know what they’re doing.
For the second type of developers, it is unclear how much of the codebase their tests actually cover; it might not even be close to half, which often is a serious issue. Even with 50% coverage, the amount of “properly” tested code could be much lower. For these developers, setting a target coverage can encourage them to write enough tests to provide a baseline level of reliability, though they might still miss covering all critical paths in the code.
Pitfalls
Enforcing minimum coverage requirements also has problems. One issue with enforcing minimum code coverage requirements is that developers often start seeing it as a target, like aiming for 80%. Instead of treating 80% as the minimum, they tend to view it as the maximum they need to hit, so they don’t go beyond that.
Worse yet, developers may write tests just to meet the target, without considering the quality of those tests. This concern is especially pointed out when aiming for 100% coverage. Such habits can degrade the test quality and lead to a false sense of confidence in the reliability of the codebase.
So, how does code coverage lead to bad tests?
Misusage
Let’s explore an example to understand a potential misuse of code coverage.
Consider the following code:
def calculate_discount(price: int, discount_type: str, discount_value: int) -> float:
    """
    Calculate the discounted price based on the given price, discount type, and discount value.
    """
    if discount_type == "fixed":
        discounted_price = price - discount_value
    elif discount_type == "percentage":
        discounted_price = price * discount_value / 100
    else:
        raise ValueError("Invalid discount type")
    return discounted_price
We also have the following test cases to verify this functionality:
def test_calculate_discount_with_fixed_discount():
    assert calculate_discount(100, "fixed", 50) == 50

def test_calculate_discount_with_invalid_discount_type():
    try:
        assert calculate_discount(100, "invalid", 50)
    except ValueError as error:
        assert str(error) == "Invalid discount type"
By running a code coverage tool, we can identify the lines of code that are not executed during testing:
discounted_price = price * discount_value / 100
At this point, if we were to focus solely on achieving 100% code coverage, we might end up with the following test cases:
# Coverage-driven Tests

def test_calculate_discount_with_fixed_discount():
    assert calculate_discount(100, "fixed", 50) == 50

def test_calculate_discount_with_percentage_discount():
    assert calculate_discount(100, "percentage", 50) == 50

def test_calculate_discount_with_invalid_discount_type():
    try:
        assert calculate_discount(100, "invalid", 50)
    except ValueError as error:
        assert str(error) == "Invalid discount type"
With these tests, measuring code coverage will report 100%. But does that mean our code is good to go? Not necessarily.
In fact, there are fundamental flaws in the logic of the calculate_discount function that need addressing:
- Logical error: When the
discount_typeispercentage, the calculation should be:discounted_price = price - (price * discount_value / 100) - A fault of omission: The specifications require that the
discounted_pricemust be equal to or greater than 1. This can be addressed by:if discounted_price < 1: return 1
This is an inherent limitation of code coverage: it only indicates which parts of your code have been executed during testing and does not tell you how the code should be written or what additional logic might be needed.
After all, using code coverage tools only to satisfy a higher coverage can lead to shallow, ineffective tests that miss critical logic and edge cases. What’s more important than the coverage value is how you use code coverage to ensure meaningful and robust testing.
Proper Usage
Improve Testing Strategy
Let’s explore how to use code coverage effectively.
Taking another look at our example, where we spot the lines that haven’t been executed:
discounted_price = price * discount_value / 100
This indicates a weakness in our tests. Certain areas are either untested or inadequately tested. And we can do better than what we saw before.
One way to enhance our test suite is by expanding our test cases with various input values:
def test_calculate_discount_with_fixed_discount():
assert calculate_discount(100, "fixed", 10) == 90
assert calculate_discount(200, "fixed", 50) == 150
def test_calculate_discount_with_percentage_discount():
assert calculate_discount(100, "percentage", 10) == 90
assert calculate_discount(200, "percentage", 50) == 100
def test_calculate_discount_with_invalid_discount_type():
try:
assert calculate_discount(100, "invalid", 50)
except ValueError as error:
assert str(error) == "Invalid discount type"
In this updated suite, the tests more comprehensively cover both fixed and percentage discount scenarios with various inputs.
Note that we have not only added a new test case, test_calculate_discount_with_percentage_discount, but also reinforced the existing test_calculate_discount_with_fixed_discount.
As a result, running these updated tests will reveal the logical error in percentage discount calculations.
Based on the test results, we may revise the calculate_discount function as follows:
def calculate_discount(price: int, discount_type: str, discount_value: int) -> float:
"""
Calculate the discounted price based on the given price, discount type, and discount value.
"""
if discount_type == "fixed":
discounted_price = price - discount_value
elif discount_type == "percentage":
discounted_price = price - (price * discount_value / 100)
else:
raise ValueError("Invalid discount type")
return discounted_price
As demonstrated, by expanding our test cases, the test suite becomes more effective at identifying errors in the code.
Again, it’s important to note that high code coverage alone doesn’t ensure your tests are meaningful or comprehensive. A more advanced and effective use of code coverage is to focus on whether the tests adequately capture edge cases and fulfill all specified requirements. This approach ensures that your tests go beyond surface-level coverage to provide deeper validation of your code’s behavior in real-world scenarios.
After a thorough examination, we can further improve our tests by adding edge cases and ensuring they reflect the specifications:
def test_calculate_discount_with_fixed_discount():
assert calculate_discount(100, "fixed", 10) == 90
assert calculate_discount(200, "fixed", 50) == 150
def test_calculate_discount_with_percentage_discount():
assert calculate_discount(100, "percentage", 10) == 90
assert calculate_discount(200, "percentage", 50) == 100
def test_calculate_discount_with_invalid_discount_type():
try:
assert calculate_discount(100, "invalid", 50)
except ValueError as error:
assert str(error) == "Invalid discount type"
def test_calculate_discount_edge_cases():
# Edge cases with zero price
assert calculate_discount(0, "fixed", 20) == 1
assert calculate_discount(0, "percentage", 20) == 1
# Edge cases with large discount_value
assert calculate_discount(100, "fixed", 200) == 1
assert calculate_discount(100, "percentage", 200) == 1
Now, not only does the code coverage reach 100%, but the tests also reveal a logical error: the calculate_discount function has incorrect logic for percentage discounts.
Additionally, we uncover an omission in the code: the discounted_price should not fall below 1.
Finally, we correct the function as follows:
def calculate_discount(price: int, discount_type: str, discount_value: int) -> float:
"""
Calculate the discounted price based on the given price, discount type, and discount value.
"""
if discount_type == "fixed":
discounted_price = price - discount_value
elif discount_type == "percentage":
discounted_price = price - (price * discount_value / 100)
else:
raise ValueError("Invalid discount type")
 if discounted_price < 1:
     return 1
return discounted_price
As a side note, reflecting on requirements, as seen here, resembles test-driven development (TDD), where you begin by writing tests that define the expected behavior and then write code to meet those tests. One of the benefits of TDD is naturally achieving high code coverage, aligning with the goals of code coverage tools. However, the two approaches differ in their focus: code coverage emphasizes identifying weaknesses in test design, while TDD focuses on writing tests to guide the development of code that meets specified requirements.
By expanding tests to consider edge cases and various inputs, you naturally improve coverage while ensuring that the function is robust and well-tested. This approach results in a more reliable codebase, reducing the risk of missing important bugs. You can apply this strategy to other parts of the codebase to ensure that the entire application is thoroughly tested.
Find Missed tests and Obsolete Code
It’s a best practice to include your tests in coverage as it helps find missed tests and outdated code, and ensures your coverage goals are accurate.
For instance, if your testing framework’s discovery conventions require test functions to have a test_ prefix, a function named tes_something will not be executed as expected.
This could lead to gaps in your test coverage, where certain pieces of code are not adequately tested.
Additionally, coverage reports can help spot obsolete code like unused fixtures. This is important because such code can introduce maintenance costs and potential bugs. By identifying and removing obsolete code, you can simplify your codebase and reduce the risk of unexpected behavior.
Conclusion
While hitting 100% code coverage feels like an accomplishment, it’s crucial to remember that high coverage alone doesn’t mean your tests are truly valuable. Think of code coverage as a tool that tells you what parts of your code are being tested—not how well they’re being tested.
To really get the most out of code coverage, you want to go beyond just covering all your lines of code. The real magic happens when you ask yourself, “Am I testing all the important scenarios? Am I covering edge cases and ensuring my code behaves correctly under all circumstances?”
Writing good tests is no easy task. It requires thoughtful planning, a deep understanding of the code, and the ability to anticipate potential edge cases and scenarios that might break the code. Code coverage tools can help develop this skill by highlighting areas of the code that haven’t been tested, prompting you to think critically about untested paths and edge cases that may otherwise be overlooked.


 (A snippet of log from Github Actions.
We use self-hosted runners to run tests and encountered this issue from time to time.
Some of the test runners was missing a required dependency to run the test.)
(A snippet of log from Github Actions.
We use self-hosted runners to run tests and encountered this issue from time to time.
Some of the test runners was missing a required dependency to run the test.)