Exposing Applications Running in EKS Cluster for External Access
To expose applications running in a Kubernetes cluster in the cloud, you need an additional component to facilitate external access. For clusters in AWS, AWS Elastic Load Balancers are the components that enable this external access.
You have two options for provisioning AWS Elastic Load Balancers:
- Manually create a load balancer and register the target pods of the
Servicewith the target groups yourself. - Install a Service or Ingress controller and let it handle the load balancer corresponding to the Kubernetes
ServiceorIngressobjects.
The first option involves a manual process and has limitations due to the dynamic nature of the Kubernetes system, as the targets can change frequently. The second option is automatic, relieving the operator from managing the load balancers, as this becomes the controller’s responsibility. For these reasons, leveraging controllers is the recommended approach for provisioning load balancers in most cases.
In this post, we will discuss the following topics:
- A brief review of AWS Elastic Load Balancers and different options for an EKS cluster.
- An overview of available controllers, including how they work, along with their pros and cons.
- Utilizing the AWS Load Balancer Controller.
AWS Elastic Load Balancers
AWS Elastic Load Balancers (ELB) are a service provided by Amazon Web Services (AWS) that automatically distributes incoming application or network traffic across multiple targets in one or more Availability Zones. They offer high availability and fault tolerance for Kubernetes clusters deployed in AWS.
Load Balancer Types
There are four types of ELBs, each suited for different use cases:
- Classic Load Balancers (CLB)
- Network Load Balancers (NLB)
- Application Load Balancers (ALB)
- Gateway Load Balancers (GWLB)
While choosing which load balancer type to use depends on the workload requirements, the most relevant types for EKS clusters are the ALB and NLB:
- Application Load Balancer (ALB):
Ideal for workloads requiring HTTP/HTTPS load balancing at Layer 7 of the OSI Model.
The ALB is managed by the
Ingressresource and routes HTTP/HTTPS traffic to corresponding Pods. - Network Load Balancer (NLB): Suitable for TCP/UDP workloads and those needing source IP address preservation at Layer 4 of the OSI Model. NLB is also preferable if a client cannot utilize DNS, as it provides static IPs.
This post focuses on using the Application Load Balancer (ALB) since it is particularly well-suited for managing HTTP/HTTPS traffic within EKS clusters, allowing for advanced routing features and better integration with Kubernetes services.
Target Type
There are two main target types of AWS Load Balancers you can choose when provisioning a load balancer for EKS:
- Instance
- IP
With the ‘Instance’ target type, the load balancer forwards traffic to the worker node on the NodePort.

This means that traffic from the load balancer is processed by the node’s networking stack, involving iptables rules or similar mechanisms, before being forwarded to the appropriate Service and pod.
This additional processing can increase latency and add complexity to monitoring and troubleshooting, as the traffic is first handled by the node before reaching the intended pod.
In contrast, with the ‘IP’ target type, the load balancer forwards traffic directly to the Pod.

This approach bypasses the node’s additional networking layers, simplifying the network path, reducing latency, and making monitoring and troubleshooting more straightforward. It also allows for direct utilization of the load balancer’s health checks, accurately reflecting the pod’s status. Additionally, using ‘IP’ mode can reduce cross-AZ data transfer costs, unlike ‘Instance’ mode, where traffic is routed through Kubernetes NodePort and ClusterIPs.
The recommended target type is ‘IP’ because direct routing avoids additional hops and overhead, providing a more efficient and straightforward traffic flow.
This post focuses on using ‘IP’ target type.
Service and Ingress Controllers
A controller is essentially a control loop that monitors changes to Kubernetes objects and takes corresponding actions, such as creating, updating, or deleting them.
For example, a service controller watches for new Service objects and provisions a load balancer using the cloud provider’s APIs when it detects one with spec.type set to LoadBalancer, as shown below:
apiVersion: v1
kind: Service
metadata:
  name: my-service
spec:
  type: LoadBalancer
  ...
The controller then sets up the load balancer’s listeners and target groups and registers the target pods of the Service.
Similarly, an ingress controller watches for any changes in Ingress objects and provisions and updates the load balancers, configuring them according to the rules specified in Ingress resources.
Below is an example of Ingress resources:
apiVersion: networking.k8s.io/v1
kind: Ingress
metadata:
  name: my-ingress
  annotations:
    alb.ingress.kubernetes.io/load-balancer-name: my-ingress
    alb.ingress.kubernetes.io/target-type: ip
spec:
  rules:
  - host: example.com
    http:
      paths:
      - path: /
        pathType: Prefix
        backend:
          service:
            name: my-service
            port:
              number: 80
More detailed usage of Ingress will be covered later in this post.
When deciding which controller to use, we will consider the following three options:
- AWS Cloud Controller Manager’s Service Controller (legacy, in-tree service controller)
- AWS Load Balancer Controller (recommended by AWS)
- Ingress-Nginx Controller (open-source implementation of an ingress controller)
While it’s beyond the scope of this discussion, these methods can be used in conjunction with each other depending on specific requirements.
AWS Cloud Controller Manager’s Service Controller (In-tree Service Controller)
AWS Cloud Controller Manager’s Service Controller is also referred to as the in-tree Service Controller as it is integrated into the Kubernetes core codebase. This means that you can use it right away because it is preinstalled with AWS Cloud Controller Manager.
It can provision Classic Load Balancers (CLBs) or Network Load Balancers (NLBs) depending on the load balancer type specified in the Service manifest.
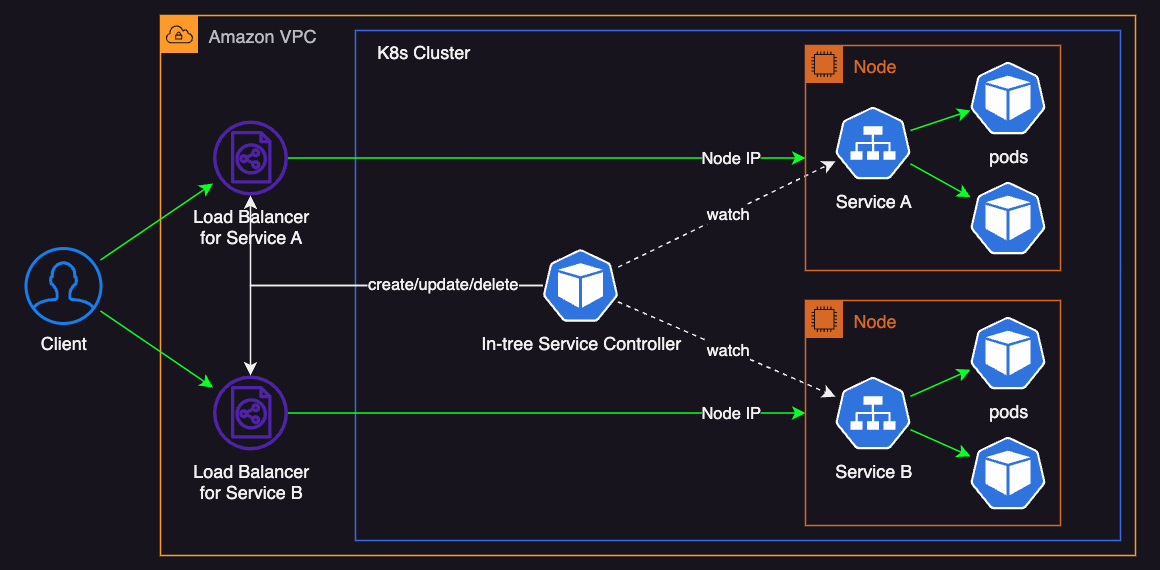
By default, it creates a CLB when it detects a new Kubernetes Service of type LoadBalancer like below:
apiVersion: v1
kind: Service
spec:
  type: LoadBalancer
  ...
To use an NLB instead of a CLB, you need to set the service.beta.kubernetes.io/aws-load-balancer-type annotation to nlb in the Service manifest:
kind: Service
metadata:
  annotations:
    service.beta.kubernetes.io/aws-load-balancer-type: nlb
spec:
  type: LoadBalancer
  ...
In general, using only Service to provision load balancers is not recommended for the following reasons:
- It does not support ALB, which provides Layer 7 (application layer) features.
- It only supports
instancetarget type, which can lead to operational complexity. - Managing multiple
Serviceobjects requires a corresponding number of load balancers, each incurring additional infrastructure cost.
This is where Kubernetes Ingress resource comes in.
The Ingress exposes and routes HTTP/HTTPS traffic to services within a Kuberentes cluster.
It means that with an ingress controller you can deploy a single load balancer and then route traffic to multiple services.
AWS Load Balancer Controller
The AWS Load Balancer Controller watches both Ingress and Service resources and manages AWS Load Balancers.
It can provision both Application Load Balancers (ALBs) and Network Load Balancers (NLBs) and offers more flexibility compared to the in-tree Service Controller.
The following diagram shows an example of using LBC with ip target-type:
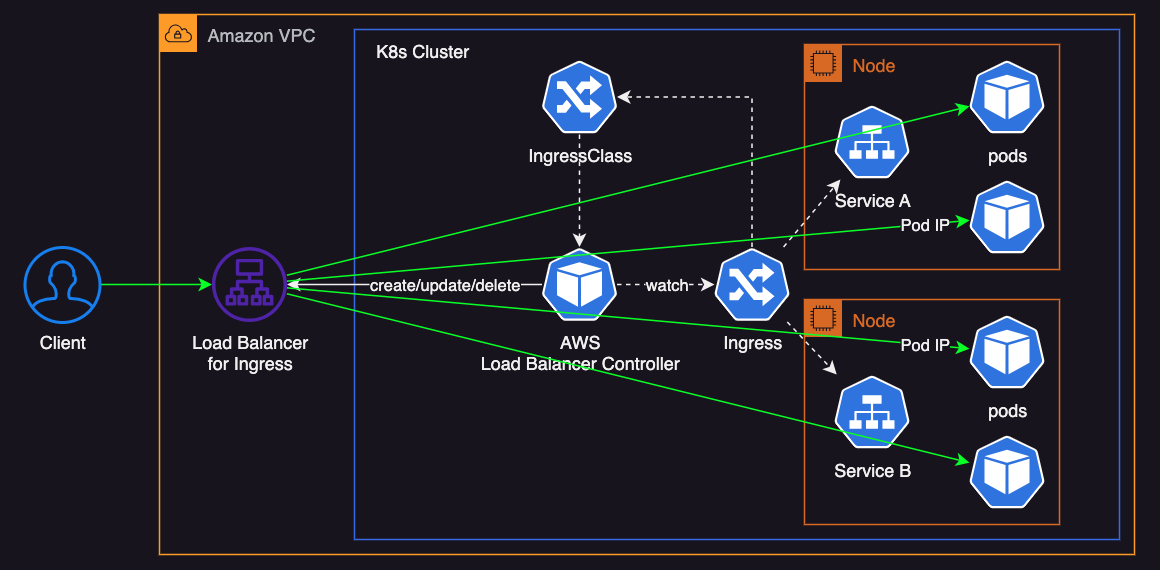
A key advantage of the AWS Load Balancer Controller is its seamless integration with Kubernetes, which simplifies the management of NLBs and ALBs through Kubernetes annotations. Unlike the in-tree service controller, this controller supports advanced features such as path-based routing, host-based routing, and other capabilities provided by AWS.
On ther other hand, while it may not be a significant drawback, it’s tightly integrated with AWS services, which can make it less portable. This can be something to consider if you somehow need to move to another cloud provider or use a multi-cloud strategy. It may also introduce some degree of a learning curve, especially for users not familiar with AWS-specific configurations.
Ingress-Nginx Controller
Ingress-Nginx deploys Nginx reverse proxy pods inside the cluster. This reverse proxy routes traffic from outside the cluster to the services. It can also act as an internal layer 7 load balancer.
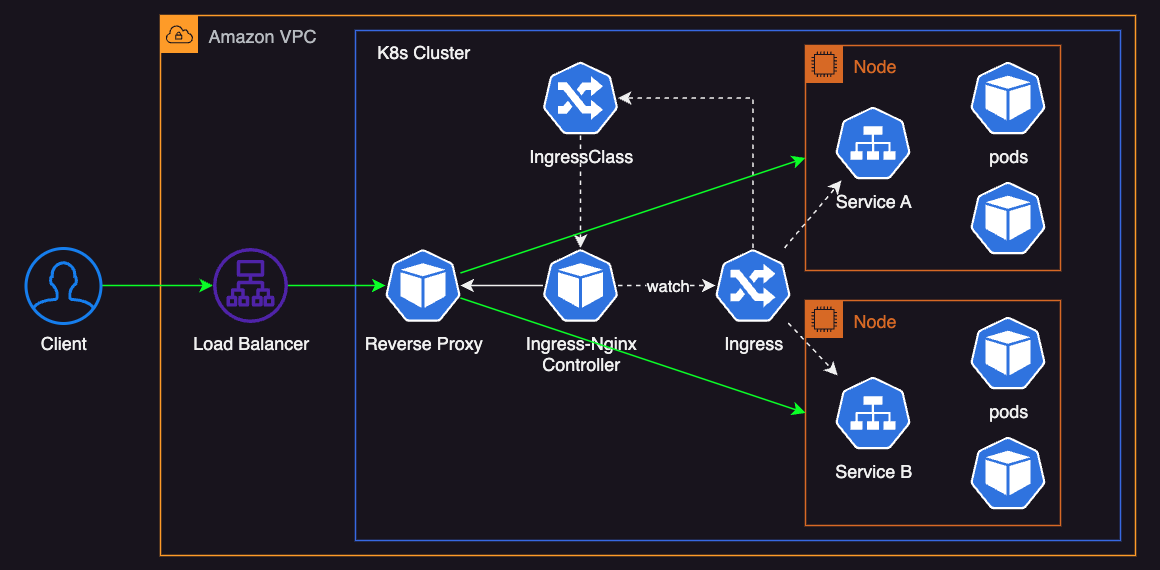
This option supports a rich feature set of Nginx, a widely used open-source project with a strong community. Since it’s not specific to AWS, it offers flexibility and provides a consistent ingress experience across different cloud providers or even on-premises environments.
On the downside, this approach introduces some operational costs, as cluster operators must monitor, maintain, and scale the underlying resources. Additionally, it may lead to increased infrastructure costs due to the need for dedicated node resources to isolate proxy pods, ensuring high reliability and availability. Lastly, there could be a minor performance overhead from the extra hops involved in routing traffic through the reverse proxy.
Overall Comparison of Load Balancer Controllers
The following table is a summary of different controllers with their pros and cons:
| Controller | Pros | Cons |
|---|---|---|
| In-tree Service Controller |
|
|
| AWS Load Balancer Controller |
|
|
| Ingress-Nginx Controller |
|
|
All in all, the AWS Load Balancer Controller is a go-to choice if you need a scalable and highly available solution with lower operational costs. If you prefer leveraging Nginx features and require more flexibility in the networking layer, the Ingress-Nginx Controller can be a good option. It’s worth noting that both AWS Load Balancer Controller and Ingress-Nginx Controller are battle-tested and reliable, so you can’t go wrong with either choice.
Now let’s go ahead and focus on the AWS Load Balancer Controller.
AWS Load Balancer Controller
The specific versions I used to demonstrate in this post are as follows:
- EKS: 1.30
- AWS LBC: 2.8
Prerequisites for non-EKS clusters
In some cases, you might need to use the AWS Load Balancer Controller for a non-EKS cluster. When this is necessary, there are a few requirements you must meet:
- Your public and private subnets must be tagged correctly for successful auto-discovery:
- For private subnets, use the tag
kubernetes.io/role/internal-elbwith a value of1. - For public subnets, use the tag
kubernetes.io/role/elbwith a value of1. - If you specify subnet IDs explicitly in annotations on services or ingress objects, tagging is not required.
- For private subnets, use the tag
- For IP targets, ensure that pods have IPs from the VPC subnets.
You can use the
amazon-vpc-cni-k8splugin to configure this.
These requirements are automatically met if you use eksctl or AWS CDK to create your VPC.
For guidance on creating an EKS cluster with AWS CDK, check out my previous post on provisioning an Amazon EKS cluster.
Create Deployment and Service (for testing)
To demonstrate how AWS LBC works, we will create Deployment and Service resources using hashicorp/http-echo, a lightweight web server commonly used for testing or demonstration purposes.
Downloading the demo.yaml file and running the command below creates two namespaces, each containing two deployments and two services, to mimic a real-world environment:
kubectl apply -f demo.yaml
You can verify the resources with the following commands:
kubectl get -n demo0 svc,deploy,poto view resources in thedemo0namespace:NAME TYPE CLUSTER-IP EXTERNAL-IP PORT(S) AGE service/echo0 ClusterIP 172.20.207.220 <none> 8000/TCP 42s service/echo1 ClusterIP 172.20.252.94 <none> 8000/TCP 42s NAME READY UP-TO-DATE AVAILABLE AGE deployment.apps/echo0 1/1 1 1 43s deployment.apps/echo1 1/1 1 1 43s NAME READY STATUS RESTARTS AGE pod/echo0-5fb8fff5bf-sp4rb 1/1 Running 0 43s pod/echo1-7588664fd4-46tl7 1/1 Running 0 43skubectl get -n demo1 svc,deploy,poto view resources in thedemo1namespace:$ kubectl get -n demo1 svc,deploy,po NAME TYPE CLUSTER-IP EXTERNAL-IP PORT(S) AGE service/echo2 ClusterIP 172.20.75.47 <none> 8000/TCP 47s service/echo3 ClusterIP 172.20.47.157 <none> 8000/TCP 47s NAME READY UP-TO-DATE AVAILABLE AGE deployment.apps/echo2 1/1 1 1 48s deployment.apps/echo3 1/1 1 1 47s NAME READY STATUS RESTARTS AGE pod/echo2-5bb6bf895-pmrvh 1/1 Running 0 48s pod/echo3-658d589bb-vh7wb 1/1 Running 0 47s
Each pod should return a simple plain text response of its name, such as echo0 or echo1, when it receives an HTTP request.
Installation
Follow the installation guide to install the AWS Load Balancer Controller.
While the official installation guide suggests using CLI tools such as eksctl and aws to configure IAM roles for service accounts (IRSA), if you’ve deployed your cluster using AWS CDK like I have, you can configure IAM permissions with AWS CDK like this:
import requests
from aws_cdk import Stack
from aws_cdk import aws_ec2 as ec2
from aws_cdk import aws_eks as eks
from aws_cdk import aws_iam as iam
from aws_cdk.lambda_layer_kubectl_v30 import KubectlV30Layer
from constructs import Construct


class EksStack(Stack):
    """
    This stack deploys an EKS cluster to a given VPC.
    """

    def __init__(self, scope: Construct, construct_id: str, vpc: ec2.Vpc, **kwargs) -> None:
        cluster = eks.Cluster(
            self,
            id="Cluster",
            version=eks.KubernetesVersion.V1_30,
            default_capacity=0,
            kubectl_layer=KubectlV30Layer(self, "kubectl"),
            vpc=vpc,
            cluster_name="my-cluster",
        )

        # ==== Configure IAM for the AWS Load Balancer Controller to have access to the AWS ALB/NLB APIs. ====
        # Download IAM policy
        url = "https://raw.githubusercontent.com/kubernetes-sigs/aws-load-balancer-controller/v2.8.1/docs/install/iam_policy.json"
        res = requests.get(url=url)
        iam_policy = res.json()

        # Create an IAM policy
        aws_lbc_iam_policy = iam.ManagedPolicy(
            self,
            id="ManagedPolicy1",
            managed_policy_name="AWSLoadBalancerControllerIAMPolicy",
            document=iam.PolicyDocument.from_json(iam_policy),
        )

        # Create a Kubernetes ServiceAccount for the LBC
        service_account = eks.ServiceAccount(
            self,
            id="ServiceAccount",
            cluster=cluster,
            name="aws-load-balancer-controller",
            namespace="kube-system",
        )

        # Attach the IAM policy to the ServiceAccount
        service_account.role.add_managed_policy(aws_lbc_iam_policy)
        # ====
If you’ve intalled the AWS LBC with helm correctly, you will see the following output:
NAME: aws-load-balancer-controller
LAST DEPLOYED: Wed Aug  7 22:34:59 2024
NAMESPACE: kube-system
STATUS: deployed
REVISION: 1
TEST SUITE: None
NOTES:
AWS Load Balancer controller installed!
If everything’s done successfully, you will be able to see the aws-load-balancer-controller deployment with kubectl as shown below:
$ kubectl -n kube-system get deployment.apps/aws-load-balancer-controller
NAME                           READY   UP-TO-DATE   AVAILABLE   AGE
aws-load-balancer-controller   2/2     2            2           32s
Ingress
Applying the following Ingress manifest creates an ALB named ingress-demo0 of ip target-type:
apiVersion: networking.k8s.io/v1
kind: Ingress
metadata:
  namespace: demo0
  name: ingress-demo0
  annotations:
    alb.ingress.kubernetes.io/load-balancer-name: ingress-demo0
    alb.ingress.kubernetes.io/scheme: internet-facing # default: internal
    alb.ingress.kubernetes.io/target-type: ip # default: instance
    alb.ingress.kubernetes.io/healthcheck-path: /healthcheck
spec:
  ingressClassName: alb
  rules:
    - http:
        paths:
          - path: /echo0
            pathType: Prefix
            backend:
              service:
                name: echo0
                port:
                  number: 8000
          - path: /echo1
            pathType: Prefix
            backend:
              service:
                name: echo1
                port:
                  number: 8000
Here’s a brief explanation on this manifest:
annotations:alb.ingress.kubernetes.io/load-balancer-name: Specifies the name of the load balancer asingress-demo0.alb.ingress.kubernetes.io/scheme: Sets the load balancer scheme tointernet-facing, making it accessible from the internet.alb.ingress.kubernetes.io/target-type: Specifies that the target type isip, meaning the load balancer targets IP addresses of the pods.alb.ingress.kubernetes.io/healthcheck-path: Sets the health check path to/healthcheck, which the ALB will use to verify the health of the targets.- There are more annotations you can configure, some of which we will cover later in this post.
spec:ingressClassName: Indicates that this Ingress resource uses the ALB Ingress controller by specifyingalb. You can find its name viakubectl get ingressclass.rules: Defines the routing rules:
- For HTTP traffic, it defines two paths:
/echo0: Routes traffic to theecho0service on port 8000./echo1: Routes traffic to theecho1service on port 8000.
- Both paths use the
Prefixpath type, which means that the paths/echo0and/echo1and any sub-paths will be matched.
The load balancer’s name, which is configured by alb.ingress.kubernetes.io/load-balancer-name, must be unique within your set of ALBs and NLBs for the region.
Otherwise, you may encounter conflicts that prevent the load balancer from being created.
The load balancers provided by the controllers are not automatically removed, even if you delete the cluster. You need to manually clean up these resources to avoid incurring unnecessary costs.
The creation process takes a short period of time.
You can get the DNS name of the load balancer with the kubectl command:
$ kubectl get ingress -n demo0
NAME            CLASS   HOSTS   ADDRESS                                                     PORTS   AGE
ingress-demo0   alb     *       ingress-demo0-1667793482.ap-northeast-3.elb.amazonaws.com   80      67s
After provisioning is complete, you can verify it by sending requests as follows:
$ curl http://ingress-demo0-1667793482.ap-northeast-3.elb.amazonaws.com/echo0
echo0
$ curl http://ingress-demo0-1667793482.ap-northeast-3.elb.amazonaws.com/echo1
echo1
So far, the ingress-demo0 ALB has three listener rules:
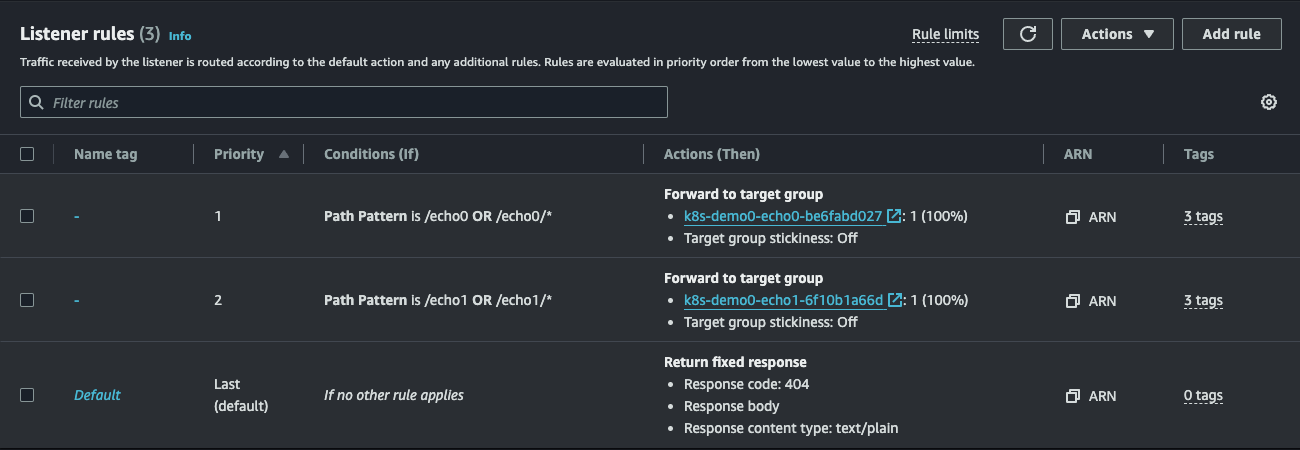
The first two listener rules are configured based on the paths from the Ingress resource.
The last listener rule is a default, which will be covered in a moment.
The load balancer can route traffic to specific target groups based on these rules.
Each target group then has the IP addresses of target pods as its targets.
This is because we’ve created a load balancer of the ip target-type.
For example, the following picture shows a target group for requests whose path is /echo0 or /echo0/*:

The target here is the IP address of a pod of echo0.
You can verify this address with the following command:
$ kubectl get endpoints echo0 -n demo0
NAME    ENDPOINTS        AGE
echo0   10.0.3.53:8000   18m
If you scale out the pods, the new addresses of those pods are registered as new targets and vice versa.
The following command increases the number of pods of echo0 to 2:
kubectl scale deployment echo0 --replicas=2 -n demo0
Once a new pod is created, the endpoint list is updated accordingly:
$ kubectl get endpoints echo0 -n demo0
NAME    ENDPOINTS                        AGE
echo0   10.0.2.185:8000,10.0.3.53:8000   18m
The new IP address is then registered in the target group:

You can also use host-based routing to direct traffic to different services based on the hostname specified in the request.
The following example demonstrates how to set up host-based routing in an Ingress resource:
apiVersion: networking.k8s.io/v1
kind: Ingress
metadata:
  namespace: demo0
  name: ingress-demo0
  annotations:
    alb.ingress.kubernetes.io/load-balancer-name: ingress-demo
    alb.ingress.kubernetes.io/scheme: internet-facing # default: internal
    alb.ingress.kubernetes.io/target-type: ip # default: instance
    alb.ingress.kubernetes.io/healthcheck-path: /healthcheck
    alb.ingress.kubernetes.io/group.name: ingress-demo
spec:
  ingressClassName: alb
  rules:
    - host: echo0.host.com
      http:
        paths:
          - path: /echo0
            pathType: Prefix
            backend:
              service:
                name: echo0
                port:
                  number: 8000
    - host: echo1.host.com
      http:
        paths:
          - path: /echo1
            pathType: Prefix
            backend:
              service:
                name: echo1
                port:
                  number: 8000
This way, any request to echo0.host.com/echo0 will be directed to the echo0 service on port 8000.
And likewise, any request to echo1.host.com/echo1 will be directed to the echo1 service on port 8000.
Again, all of this is done automatically by the ingress controller.
DefaultBackend
If you send requests to the paths not specified in the rules in the Ingress resource, you will get a “404 Not Found error” by default:
$ curl -i ingress-demo0-1667793482.ap-northeast-3.elb.amazonaws.com
HTTP/1.1 404 Not Found
Server: awselb/2.0
Date: Wed, 07 Aug 2024 13:51:53 GMT
Content-Type: text/plain; charset=utf-8
Content-Length: 0
Connection: keep-alive
This can be configured with the DefaultBackend.
For demonstration purposes, let’s create a new resource that returns plain text saying “This is the default server.”:
apiVersion: apps/v1
kind: Deployment
metadata:
  namespace: demo0
  name: default-backend
  labels:
    app.kubernetes.io/name: default-backend
spec:
  selector:
    matchLabels:
      app.kubernetes.io/name: default-backend
  template:
    metadata:
      labels:
        app.kubernetes.io/name: default-backend
    spec:
      containers:
        - name: default-backend
          image: hashicorp/http-echo
          args:
            - -listen=:8000
            - -text=This is the default server.
          resources:
            limits:
              cpu: 10m
              memory: 50Mi
---
apiVersion: v1
kind: Service
metadata:
  namespace: demo0
  name: default-backend
  labels:
    app.kubernetes.io/name: default-backend
spec:
  type: ClusterIP
  selector:
    app.kubernetes.io/name: default-backend
  ports:
    - protocol: TCP
      appProtocol: http
      port: 8000
      targetPort: 8000
Here’s an example of configuring DefaultBackend to route any traffic that doesn’t match any rule to the default-backend service:
apiVersion: networking.k8s.io/v1
kind: Ingress
metadata:
  namespace: demo0
  name: ingress-demo0
  annotations:
    alb.ingress.kubernetes.io/load-balancer-name: ingress-demo0
    alb.ingress.kubernetes.io/scheme: internet-facing # default: internal
    alb.ingress.kubernetes.io/target-type: ip # default: instance
    alb.ingress.kubernetes.io/healthcheck-path: /healthcheck
spec:
  ingressClassName: alb
  defaultBackend:
    service:
      name: default-backend
      port:
        number: 8000
  rules:
    ...
Verify the result with the following command:
$ curl ingress-demo0-1667793482.ap-northeast-3.elb.amazonaws.com
This is the default server.
If you happen to misconfigure the default backend to route to the wrong service, you will get a “503 Service Temporarily Unavailable” error:
HTTP/1.1 503 Service Temporarily Unavailable
Server: awselb/2.0
Date: Wed, 07 Aug 2024 13:54:22 GMT
Content-Type: text/plain; charset=utf-8
Content-Length: 30
Connection: keep-alive

Backend service does not exist
Healthcheck
As mentioned earlier, the AWS LBC leverages the Load Balancer’s health checks, which can directly represent the pod’s status.
Health checks of a target group in AWS are important because they ensure traffic is only routed to healthy targets, preventing failed or degraded targets from affecting application performance. This improves overall reliability and user experience by maintaining the high availability and stability of the service.
Aside from the alb.ingress.kubernetes.io/healthcheck-path annotation in the Ingress resource above, there are a few more options we can use to configure how to health check targets:
alb.ingress.kubernetes.io/healthcheck-port(default:traffic-port)alb.ingress.kubernetes.io/healthcheck-protocol(default:HTTP)alb.ingress.kubernetes.io/healthcheck-interval-second(default:15)alb.ingress.kubernetes.io/healthcheck-timeout-second(default:5)alb.ingress.kubernetes.io/healthy-threshold-coun(default:2)alb.ingress.kubernetes.io/unhealthy-threshold-coun(default:2)alb.ingress.kubernetes.io/success-codes(default:200)
For example, if you increase alb.ingress.kubernetes.io/healthcheck-interval-seconds value, the frequency of health checks will decrease, which can reduce the load on your application but may also delay the detection of unhealthy targets.
The default values might suffice in most cases; however, tuning these parameters can be beneficial depending on the specific needs of your application. Adjusting health check settings allows for finer control over how quickly unhealthy targets are detected and how aggressively traffic is rerouted, which can be crucial for optimizing performance and ensuring high availability.
Ingress group
Previously, we deployed four services—echo0, echo1, echo2, and echo3—in two different namespaces: demo0 and demo1.
We created an Ingress in demo0 namespace to route traffic to echo0 and echo1, since Kubernetes Ingress resources can only route traffic to backend services within the same namespace.
This means that to route traffic to echo2 and echo3 in demo1 namespace, we would need to create a new Ingress, resulting in the provisioning of a new load balancer.
While this design might be suitable in certain scenarios, it’s often inefficient from both an infrastructural and operational perspective when dealing with numerous Ingress resources in the cluster, which is a common situation.
If you don’t need multiple load balancers for each Ingress resource, it’s better to optimize the setup.
With alb.ingress.kubernetes.io/group.name annotation, we can use a single load balancer for multiple Ingress resources.
The example below demonstrates this setup:
apiVersion: networking.k8s.io/v1
kind: Ingress
metadata:
  namespace: demo0
  name: ingress-demo0
  annotations:
    alb.ingress.kubernetes.io/load-balancer-name: ingress-demo
    alb.ingress.kubernetes.io/scheme: internet-facing # default: internal
    alb.ingress.kubernetes.io/target-type: ip # default: instance
    alb.ingress.kubernetes.io/healthcheck-path: /healthcheck
    alb.ingress.kubernetes.io/group.name: ingress-demo
spec:
  ingressClassName: alb
  rules:
    - http:
        paths:
          - path: /echo0
            pathType: Prefix
            backend:
              service:
                name: echo0
                port:
                  number: 8000
          - path: /echo1
            pathType: Prefix
            backend:
              service:
                name: echo1
                port:
                  number: 8000
apiVersion: networking.k8s.io/v1
kind: Ingress
metadata:
  namespace: demo1
  name: ingress-demo1
  annotations:
    alb.ingress.kubernetes.io/load-balancer-name: ingress-demo
    alb.ingress.kubernetes.io/scheme: internet-facing # default: internal
    alb.ingress.kubernetes.io/target-type: ip # default: instance
    alb.ingress.kubernetes.io/healthcheck-path: /healthcheck
    alb.ingress.kubernetes.io/group.name: ingress-demo
spec:
  ingressClassName: alb
  rules:
    - http:
        paths:
          - path: /echo2
            pathType: Prefix
            backend:
              service:
                name: echo2
                port:
                  number: 8000
          - path: /echo3
            pathType: Prefix
            backend:
              service:
                name: echo3
                port:
                  number: 8000
Keep in mind that adding the alb.ingress.kubernetes.io/group.name annotation will result in replacing the existing load balancer with a new one.
This can potentially cause downtime or configuration issues, which is something you might want to avoid in a production environment.
After creating a new Ingress like the example above, we have two ingresses:
$ kubectl get ingress --all-namespaces
NAMESPACE   NAME            CLASS   HOSTS   ADDRESS                                                    PORTS   AGE
demo0       ingress-demo0   alb     *       ingress-demo-1596788157.ap-northeast-3.elb.amazonaws.com   80      92s
demo1       ingress-demo1   alb     *       ingress-demo-1596788157.ap-northeast-3.elb.amazonaws.com   80      87s
Now that since the two Ingress resources share the same load balancer, the LB has 5 listener rules including Default:
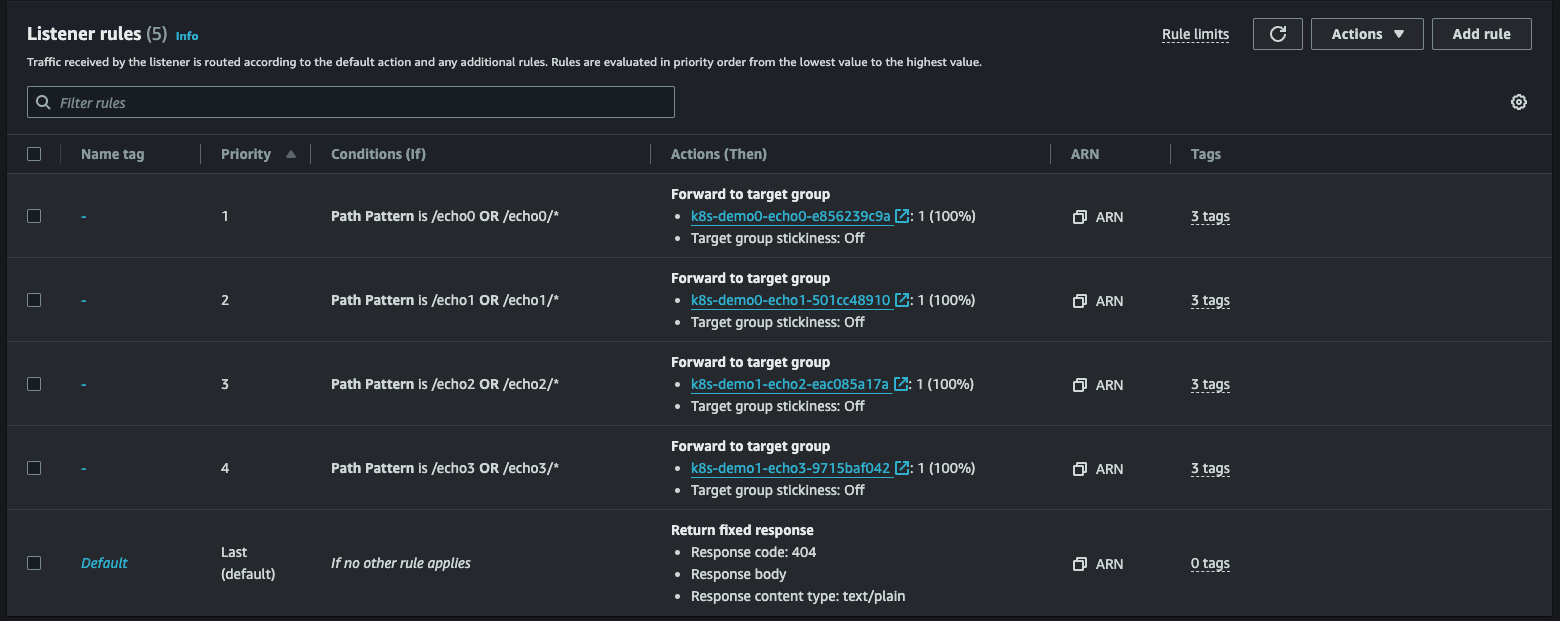
You can verify the results with the following commands (with a new DNS name this time):
$ curl ingress-demo-1596788157.ap-northeast-3.elb.amazonaws.com/echo0
echo0
$ curl ingress-demo-1596788157.ap-northeast-3.elb.amazonaws.com/echo1
echo1
$ curl ingress-demo-1596788157.ap-northeast-3.elb.amazonaws.com/echo2
echo2
$ curl ingress-demo-1596788157.ap-northeast-3.elb.amazonaws.com/echo3
echo3
The priority of a listener can be modified using the alb.ingress.kubernetes.io/group.order annotation, which defaults to 0.
If you don’t explicitly specify the order, the rule order among Ingresses within the same IngressGroup is determined by the lexical order of the Ingress’s namespace/name.
When multiple Ingresses share the same load balancer via the alb.ingress.kubernetes.io/group.name annotation, deleting one of the Ingresses does not remove the load balancer.
The load balancer is deleted only when all associated Ingress resources are deleted.
IngressClass
IngressClass is a cluster-wide resource that any Ingress resource across all namespaces can refer to.
To have the ingress controller handle a specific Ingress, we need to specify the ingressClassName as alb.
Alternatively, you can skip specifying the ingressClassName by setting the ingressclass.kubernetes.io/is-default-class annotation to true on the alb IngressClass.
Here’s the command to add the annotation to the alb IngressClass:
kubectl annotate ingressclass alb ingressclass.kubernetes.io/is-default-class=true -n kube-system
After this update, any new Ingress resource without an ingressClassName will implicitly use alb as its default IngressClass.
Alternatively, you can create your own IngressClass and configure all Ingress resources to reference that IngressClass by default.
Access control
Access control in AWS is typically managed by security groups. Security groups in AWS act as virtual firewalls for your resources, such as load balancers, controlling both incoming and outgoing traffic.
You can update the security group with the following annotations:
alb.ingress.kubernetes.io/inbound-cidrsalb.ingress.kubernetes.io/security-group-prefix-listsalb.ingress.kubernetes.io/listen-ports
By default, the controller will automatically create one security group that allows access from from alb.ingress.kubernetes.io/inbound-cidrs and alb.ingress.kubernetes.io/security-group-prefix-lists to the alb.ingress.kubernetes.io/listen-ports.
If any of these annotations is not present, the load balancer allows incoming traffic from any IP address to the HTTP:80 or HTTPS:443 port depending on whether alb.ingress.kubernetes.io/certificate-arn is specified.
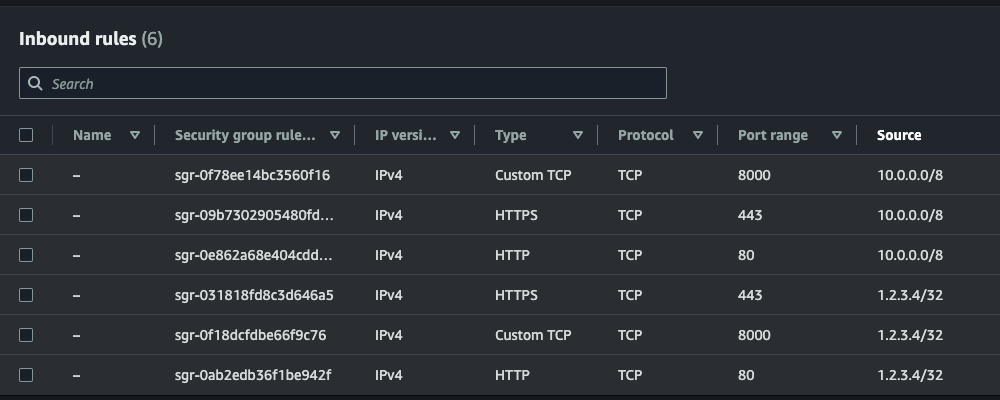
For example, the following annotations update the target group to allow access from 10.0.0.0/8 or 1.2.3.4/32 to the ports of HTTP:80, HTTP:443, and HTTP:8000:
apiVersion: networking.k8s.io/v1
kind: Ingress
metadata:
  annotations:
    alb.ingress.kubernetes.io/inbound-cidrs: "10.0.0.0/8,1.2.3.4/32"
    alb.ingress.kubernetes.io/listen-ports: '[{"HTTP": 80}, {"HTTPS": 443}, {"HTTP": 8000}]'
    ...
After updating the Ingress, the inbound rules will be updated accordingly:
Using existing security groups is also possible through the alb.ingress.kubernetes.io/security-groups annotation.
This annotation takes precedence over the alb.ingress.kubernetes.io/inbound-cidrs annotation.
Additionally, setting alb.ingress.kubernetes.io/scheme to internal will make your load balancer only accessible from within your VPC.
This is useful when you want to restrict access to your application to only resources within your VPC, enhancing security by preventing external access.
For more granular access control, you can consider using a service mesh like Istio.
Access logs
AWS load balancers provide the option to store access logs of all requests made to them, which can be instrumental in diagnosing issues, analyzing traffic patterns, and maintaining security.
To enable the access logs feature, you must have an S3 bucket for storing the logs. You can either create a new bucket or use an existing one. For instructions on creating an S3 bucket, visit this AWS documentation.
If you use AWS CDK, below is an example to provision an S3 bucket for storing access logs of a load balancer for regions available before August 2022:
from aws_cdk import Duration, RemovalPolicy, Stack
from aws_cdk import aws_iam as iam
from aws_cdk import aws_s3 as s3
from constructs import Construct


class S3Stack(Stack):
    """
    This stack deploys an EKS cluster to a given VPC.
    """

    def __init__(self, scope: Construct, construct_id: str, **kwargs) -> None:
        super().__init__(scope, construct_id, **kwargs)

        # Create an S3 bucket for storing ELB access logs
        lb_access_logs_bucket = s3.Bucket(
            self,
            "LBAccessLogBucket",
            auto_delete_objects=True,
            block_public_access=s3.BlockPublicAccess.BLOCK_ALL,
            bucket_name="my-elb-access-logs",  # This name must be unique across all existing bucket names in Amazon S3
            encryption=s3.BucketEncryption.S3_MANAGED,  # This is the only server-side encryption option for access logs
            enforce_ssl=True,
            lifecycle_rules=[s3.LifecycleRule(expiration=Duration.days(90))],
            removal_policy=RemovalPolicy.DESTROY,
            versioned=False,  # default
        )

        # Define the bucket policy for ELB permission to write access logs
        elb_account_id = "383597477331"  # Replace it with the ID for your region
        prefix = "my-prefix"
        bucket_policy = iam.PolicyStatement(
            effect=iam.Effect.ALLOW,
            principals=[iam.ArnPrincipal(f"arn:aws:iam::{elb_account_id}:root")],
            actions=["s3:PutObject"],
            resources=[f"{lb_access_logs_bucket.bucket_arn}/{prefix}/AWSLogs/{self.account}/*"],
        )

        # Attach the policy to the bucket
        lb_access_logs_bucket.add_to_resource_policy(bucket_policy)
After provisioning an S3 bucket, add the alb.ingress.kubernetes.io/load-balancer-attributes annotation as shown below:
apiVersion: networking.k8s.io/v1
kind: Ingress
metadata:
  annotations:
    # Replace `my-elb-access-logs` and `my-prefix` with the values you used to create your S3 bucket.
    alb.ingress.kubernetes.io/load-balancer-attributes: access_logs.s3.enabled=true,access_logs.s3.bucket=my-elb-access-logs,access_logs.s3.prefix=my-prefix
    ...
Once you apply the Ingress, the access logs will be sent to the specified S3 bucket.
For example log entries, visit this AWS documentation.
Note that removing the annotation does not disable access logs.
To disable access logs, you need to explicitly set this value to access_logs.s3.enabled=false as shown below:
apiVersion: networking.k8s.io/v1
kind: Ingress
metadata:
  annotations:
    alb.ingress.kubernetes.io/load-balancer-attributes: access_logs.s3.enabled=false
    ...
Similarly, you can also enable connection logs:
apiVersion: networking.k8s.io/v1
kind: Ingress
metadata:
  annotations:
    # Replace `my-connection-log-bucket` and `my-prefix` with the values you used to create your S3 bucket.
    alb.ingress.kubernetes.io/load-balancer-attributes: connection_logs.s3.enabled=true,connection_logs.s3.bucket=my-connection-log-bucket,connection_logs.s3.prefix=my-prefix
    ...
Since the access log files are stored in S3 buckets in compressed format, it’s not the most convenient for reading log files directly. You typically have to use analytical tools to analyze and process access logs.
One strategy to analyze and process access logs is to use Amazon Athena. Amazon Athena allows you to query data directly from S3 using SQL. You can create a table in Athena to map the log data format and then run SQL queries to analyze the logs. For more details, visit this AWS documentation.
References
- Exposing Kubernetes Applications, Part 1: Service and Ingress Resources
- Exposing Kubernetes Applications, Part 2: AWS Load Balancer Controller
- AWS Load Balancer Controller
- Kubernetes Reference on Ingress
- EKS Best Practcies Guides on Load Balancing
- Enable access logs for your Application Load Balancer
- Route application and HTTP traffic with Application Load Balancers
- Addressing latency and data transfer costs on EKS using Istio